Categori
- Bisinis Online (10)
- Blogging (34)
- Facebookers (6)
- Gaming (3)
- Internet (1)
- Photoshop (4)
- SEO (4)
- Tajwid (1)
- Teknologi (1)
- Tips Blogger (43)
- Tips N Trick (4)
Sabtu, 25 Juni 2011
 langsung saja ikuti langkah-langkahnya:
1. login ke blogger
2. pilih edit tamplate/tataletak
3. lalu pilih Edit HTML
5. angan mencentang kotak kecil di samping tulisan expand widget template
6. Cari kode ]]></b:skin> :
7. copy kode di bawah ini dan simpan di atas kode ]]></b:skin> :
/* bottom
---------------------------- */ #bottom {
width: 660px;
position: relative;
clear:both;
margin: 0 auto;
color:#fff;
float: left;
background:#BDBABD;
padding: 15px 0 15px 0;
}
#bottom h2 {
padding: 5px 0 2px 0;
margin: 0 0 10px 0;
color:#ff5a00;
font-size: 24px;
letter-spacing: -1px;
border-bottom: 1px solid #fff;
}
#bottom ul {
padding: 0;
margin: 0;
}
#bottom ul li {
line-height: 26px;
list-style-type: none;
border-bottom: 1px dashed #031c5d;
}
#bottom ul li a {
display: block;
padding: 0 10px;
color:#0701FD;
text-decoration: none;
}
#bottom ul li a:hover {
background: #B1ACB1;
}
#left-bottom { /* yang ini nih kode kolom kiri */
width: 205px;
float: left;
padding-left:10px;
}
#center-bottom { /* kalo yg ini kode kolom tengah */
width: 205px;
float: left;
padding-left:10px;
}
#right-bottom { /* kalo yg ini kode kolom kanan */
width: 205px;
float: left;
padding: 0 5px 0 10px;
}
8. lihat bagian </body> yaitu pada bagian bawah kode template, dan cari kode yang mirip seperti ini :
<div id='footer-wrapper'>
<b:section class='footer' id='footer'/>
</div>
9. Copy paste kode berikut persis di atas kode yang atas tadi :
<div id='box-main-container'>
<div id='box1' style='width: 30%; float: left; margin:0; text-align: left;'>
<b:section class='box-column' id='col1' preferred='yes' style='float:left;'/>
</div>
<div id='box2' style='width: 40%; float: left; margin:0; text-align: left;'>
<b:section class='box-column' id='col2' preferred='yes' style='float:left;'/>
</div>
<div id='box3' style='width: 30%; float: right; margin:0; text-align: left;'>
<b:section class='box-column' id='col3' preferred='yes' style='float:right;'/>
</div>
<div style='clear:both;'/>
</div>
10. Jangan lupa akhiri dengan mengklik tombol Simpan Template.
Setelah itu kita masuk langkah ke 2 :
1. Klik menu Elemen Halaman.
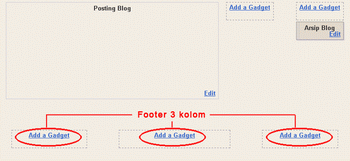
2. Lihat apakah kolom yang tadi dibuat sudah tampak atau belum? jika sudah, klik link Tambah sebuah Elemen Halaman, klik tombol TAMBAHKAN KE BLOG. terserah anda mau nambah apa. setelah beres klik tombol SIMPAN.
jika ada masalah,tulis komentar di bawah......!!!!
selamat mencoba.
Langganan:
Posting Komentar (Atom)


0 komentar:
Posting Komentar